Did you ask how to photoshop someone into a picture if you did you are in the right place. In this post, I will teach you how to do it. Because photoshopping someone into a picture is one of the most exciting things you can do as a photo editor. But even if you’re not a photo editor photoshopping someone into a picture is always very fun to do. You could place anyone anywhere. But before we take a look at how to photoshop someone into a picture I suggest you read the guide overview first so that you are extra prepared.
Table of Contents
How to photoshop someone into a picture
Guide Overview
In this Guide, I will teach you how to photoshop someone into a picture using Photoshop. The guide contains 4 steps. In step 1 I will talk about how to cut a person out of a picture. In step 2 I will talk about how to match your person with the light of the picture and the size. In step 3 I will talk about how to match colors. And in step 4 the last step I will talk about how to add a shadow. Now you know what the steps are all about so now we can take at how to Photoshop someone into a picture.
1. Step: Cutting the person
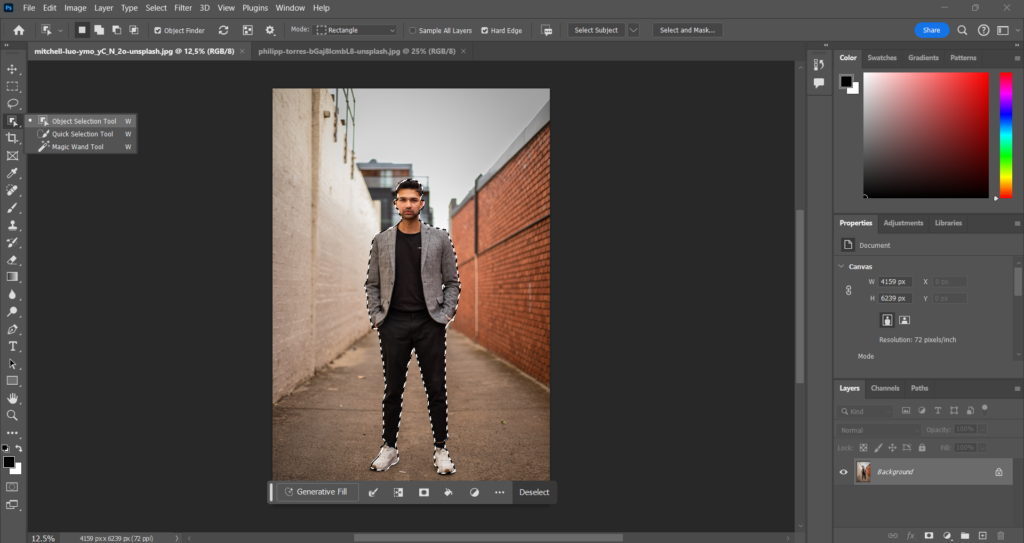
To get started you will first need to add the place where you want the person to be and the person itself of course. But if your person is in another place you will need to cut the person out. Start with adding your place and person to Photoshop and select the picture with the person in it.
To cut the person out I recommend you use the object selection tool. Photoshop will automatically cut the person out if you click on the person. But if Photoshop did something wrong or you want to do it yourself you can use your own cutting tool or techniques.
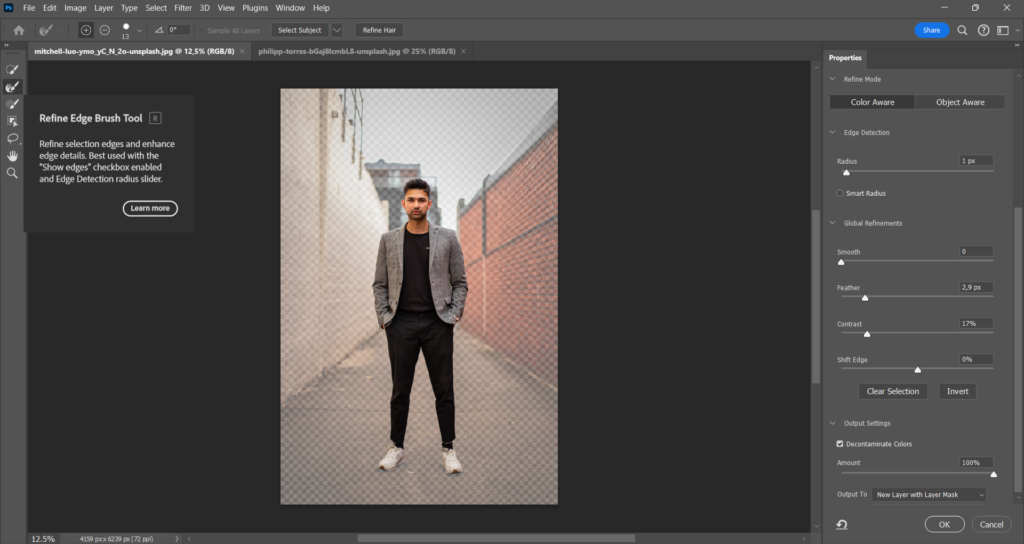
If the person is cut out click on select and mask and give the person a 1px radius you can give it some contrast or feather if you want. After that, it should be pretty smooth but you can also use the refine brush to fix those last little details. Now click on decontaminate colors change output to new layer with layer mask and click on ok.
2. Step: Matching the light and size
To match the lighting and size you will first need to import your person into the other picture basically the place where you want the person to be. To do this place your person on the picture using the move tool wait till you see the picture and then release it.
It could be that the person is very big right now or too small. To fix this hold on CTRL+T and choose a size that fits the place where you are. And if you’re done click on done.
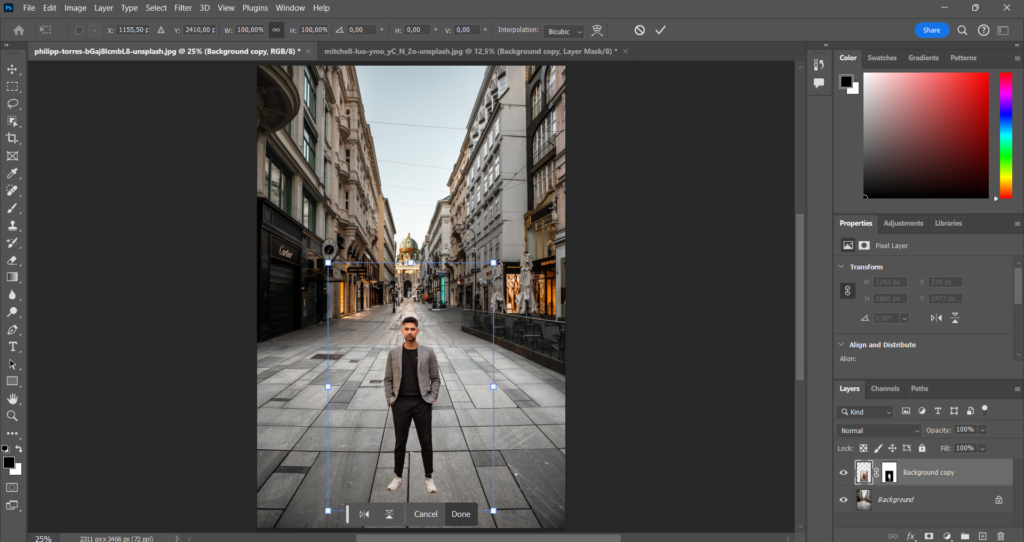
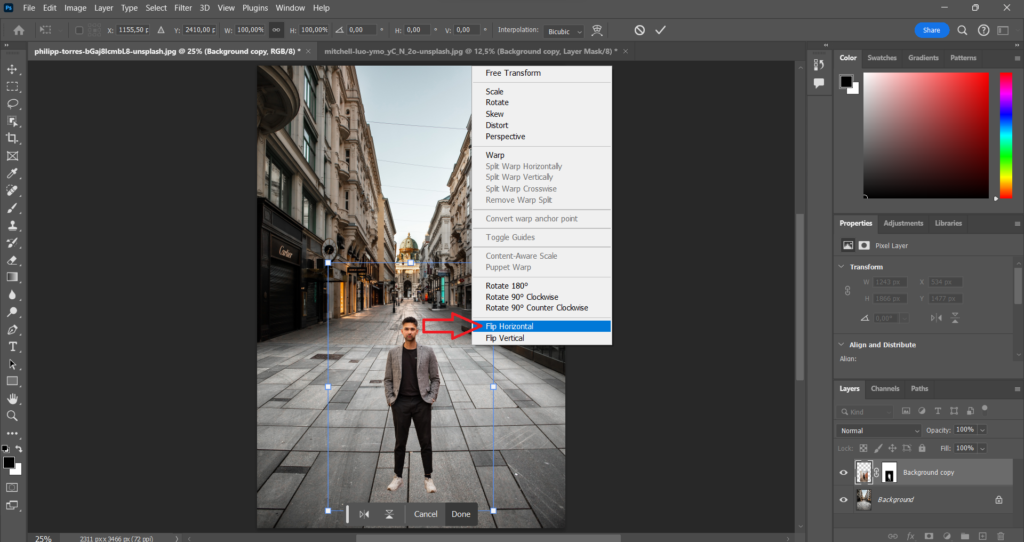
To match the Lighting it really depends on your picture because it could be that light is everywhere or not or there is no sun or the light comes from a specific direction. All these kinds of things so what you can try is hold CTRL+T and left-click on the person and click on flip horizontal and see if it looks more realistic than before.
3. Step: Matching the colors
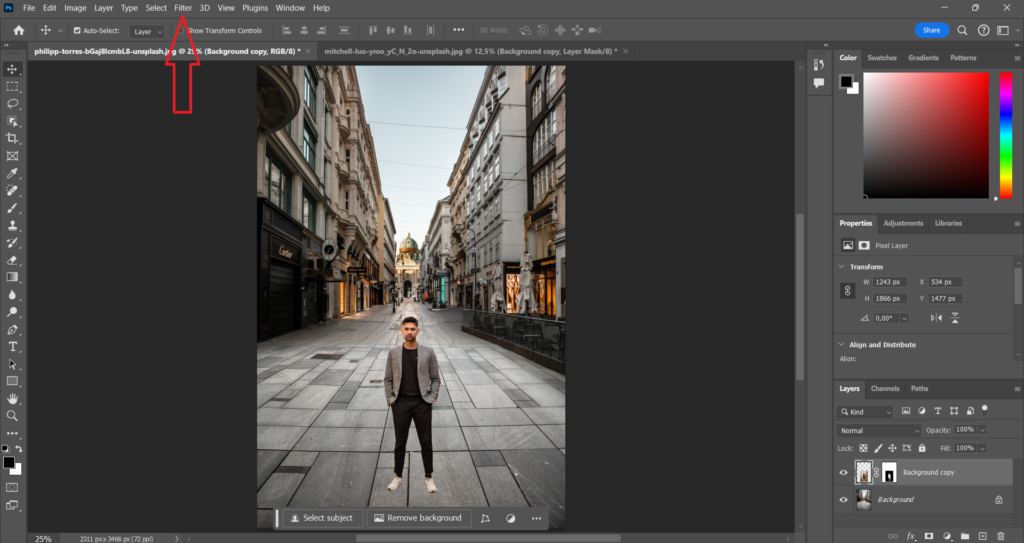
To match the colors make sure the layer of the person is selected and click on filter. You can find filter somewhere at the top of your screen.
After you click on filter select neural filters and turn on harmonization. Click on Select a Layer and choose Background now wait till the filter is added.
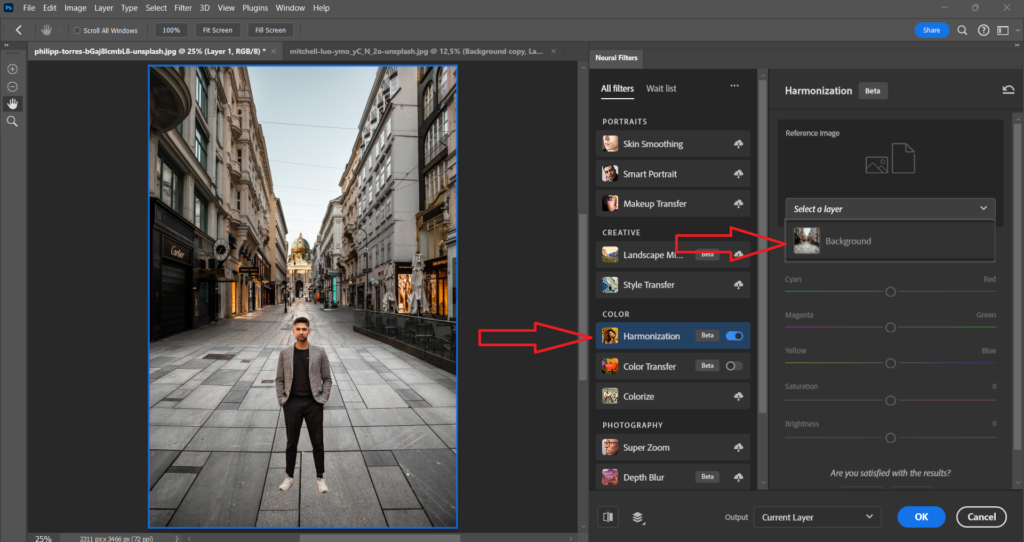
You can also change the settings of the filter and if you do only change the strength and brightness. I won’t give specific numbers just play around a bit and see what is more realistic and click on OK.
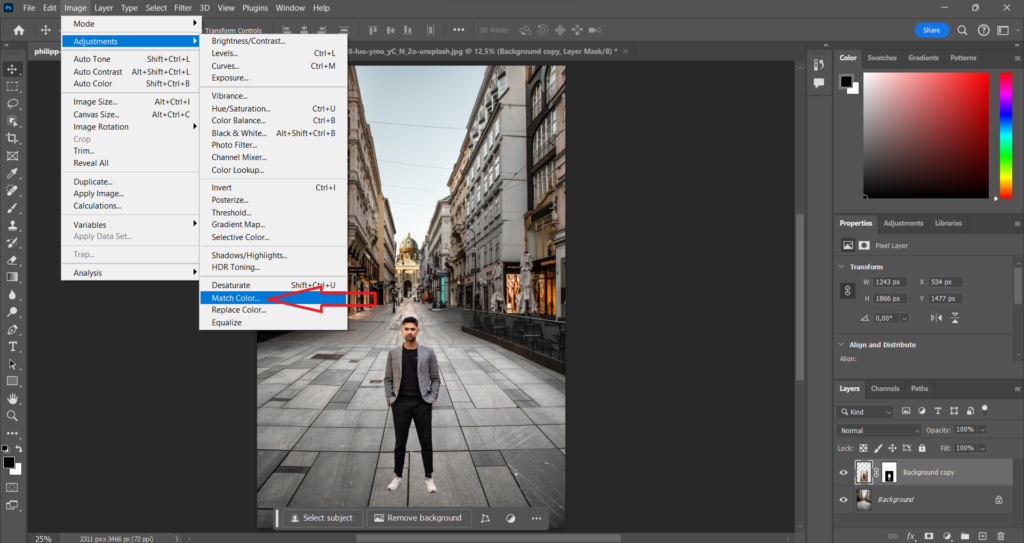
But if you’re using an older version of Photoshop click on image. You can find image somewhere at the top of your screen. After you click on image select adjustments choose match colors and play a bit the settings to see what fits best.
4. Step: Using a shadow
In the picture that I’m using, the sun does not really shine in my person’s direction because of the buildings and the position of the sun so in my case, a shadow would not be really necessary. But it could be that you need one. To add a shadow you need to make sure the layer of your person is still selected and click on effects. You can find effects all the way down under your layer section.
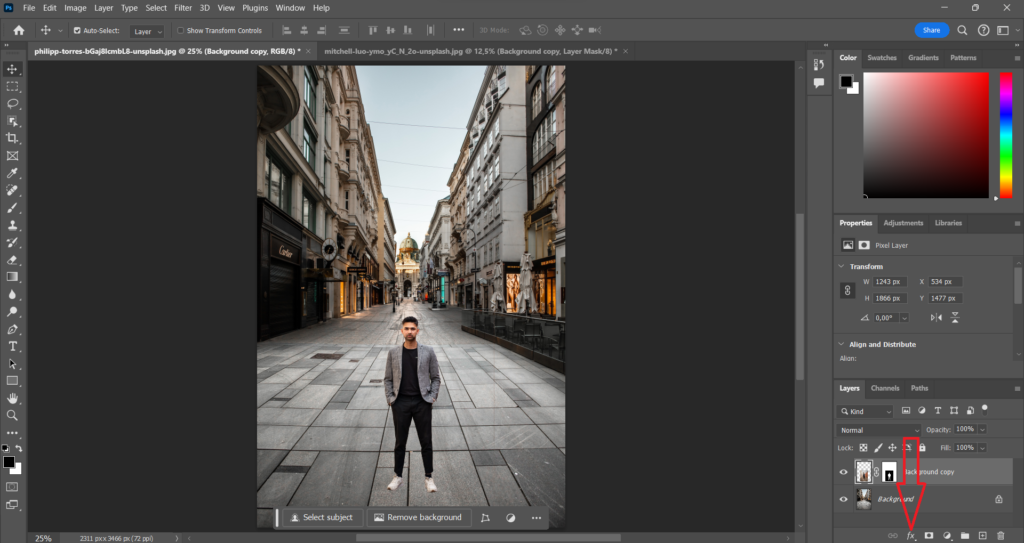
After you click on effects select drop shadow. Now you can see the shadow and drag the shadow to change position. But It could be that the shadow you see now is not positioned realistic and does not match the lighting of your picture.
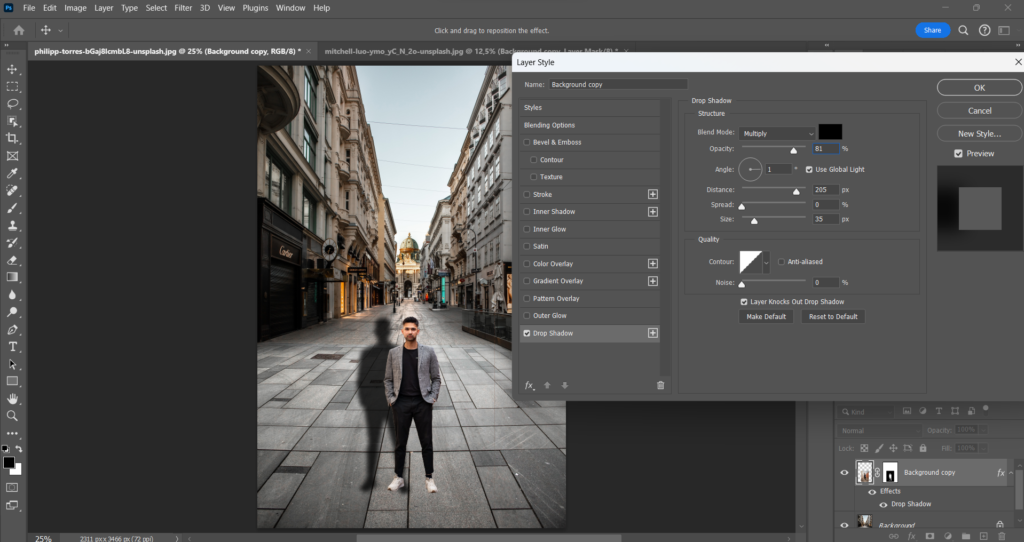
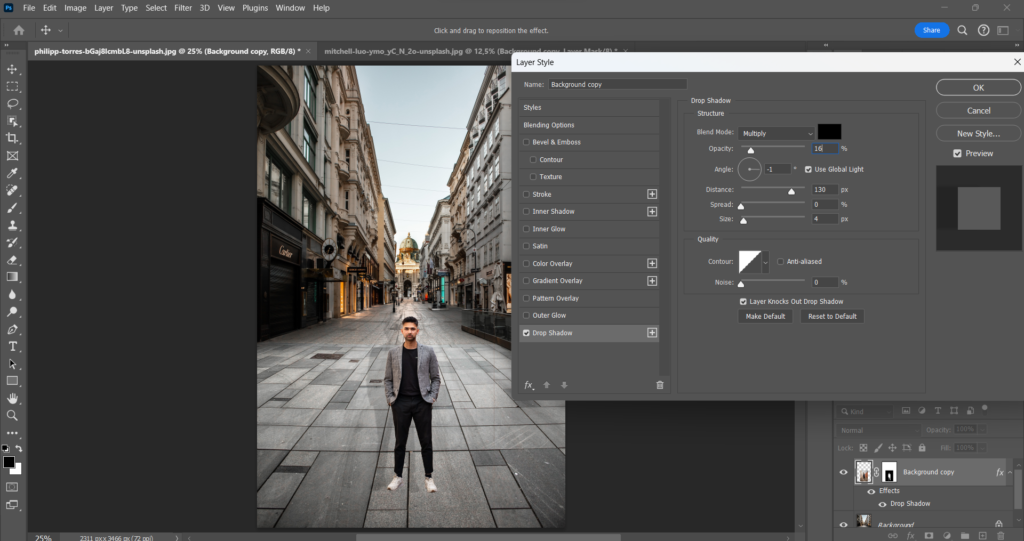
To match the lighting from your shadow with the picture you can change the opacity of your shadow and the size and if you’re done click on OK. And if the shadow is already positioned realistic enough you could leave it like that. But if the position of your shadow is still unrealistic try this.
Under your person layer, you can now see drop shadow right-click on it and select Create layer. It could be that Photoshop will warn you but just click on OK.
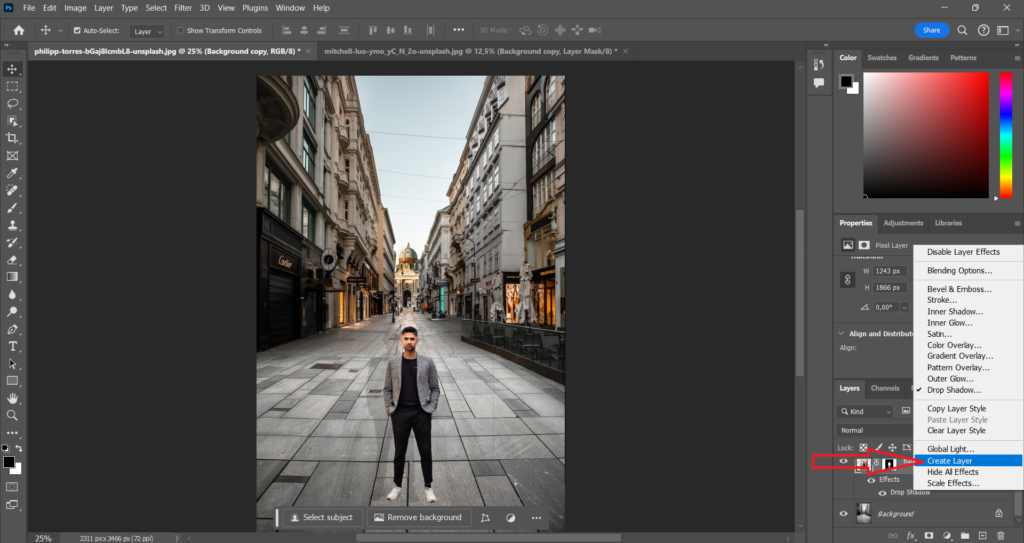
Select the shadow layer and hold CTRL+T. Look where the light is coming from and place your shadow in the right position using the squares. And if you right-click your shadow you can use skew and distort to make it more realistic if needed.
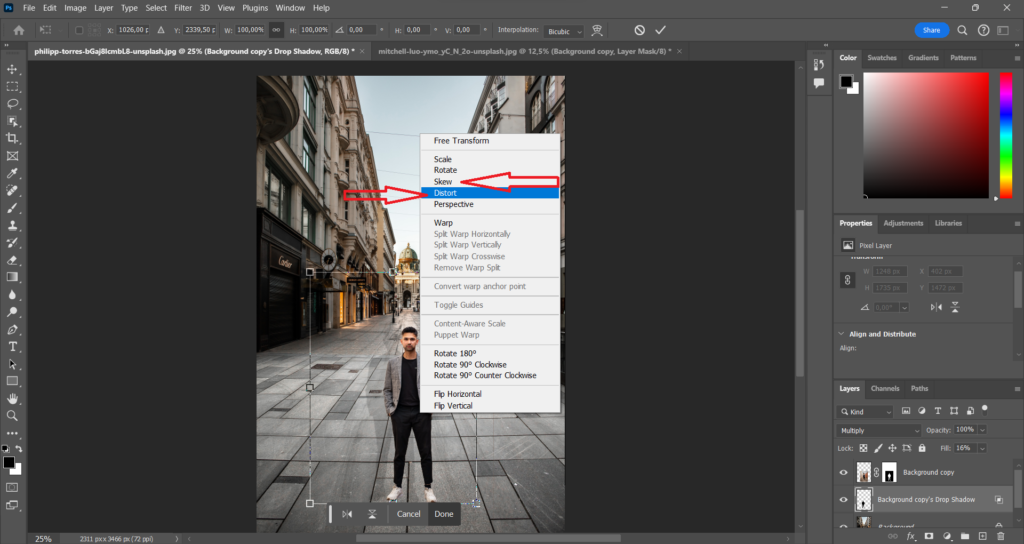
To finish it off make sure the shadow layer is still selected and set an opacity for the selected layer. Choose a percentage that looks realistic.
Final Thoughts
If read all the way from the beginning till here I think it’s pretty safe to say that you know now how to Photoshop someone into a picture using my guide. I tried to make the guide as easy as possible so I hope you came across no problems or became irritated during this guide. But if the guide did not help and you still do not know how to Photoshop someone into a picture I suggest you do more research on Google. I’m pretty sure there are some different methods of photoshopping someone in a picture using Photoshop. But if you do know how to Photoshop someone into a picture I’m very happy I could help.


